在 Django 编写博客时添加简单的全文搜索的功能。使用到了 haystack、whoosh 和 jieba 三个项目
haystack 是一个与 whoosh 交互的连接工具,属于一种全文检索的框架。官网
Whoosh 是一个全文检索引擎,由 python 编写。官方文档
jieba 是一个中文分词工具。github 库
首先需要安装这三个库
pip install django-heystack whoosh jieba
这三个库的版本
django-haystack==2.8.1
jieba==0.39
Whoosh==2.7.4
简单实现 然后在 Django 的项目 settings.py 中添加配置。首先将'haystack'添加到INSTALLED_APPS列表中
INSTALLED_APPS = [ 'django.contrib.admin' , ...... 'blog' , 'account' , 'haystack' , ]
并添加一端配置
HAYSTACK_CONNECTIONS = { 'default' : { 'ENGINE' : 'haystack.backends.whoosh_cn_backend.WhooshEngine' , 'PATH' : os.path.join(os.path.dirname(__file__), 'whoosh_index' ), }, } HAYSTACK_SIGNAL_PROCESSOR = 'haystack.signals.RealtimeSignalProcessor'
官网配置文档
基本配置:https://django-haystack.readthedocs.io/en/v2.8.1/tutorial.html#configuration
所有设置字段:https://django-haystack.readthedocs.io/en/v2.8.1/settings.html#
在项目目录下的 urls.py 中添加 url。
urlpatterns = [
......
    url(r'^search/', include('haystack.urls')),
]
在应用目录下创建search_indexes.py
from haystack import indexesfrom .models import Articleclass ArticleIndex (indexes.SearchIndex, indexes.Indexable): text = indexes.CharField(document=True , use_template=True ) def get_model (self ): return Article def index_queryset (self, using=None ): return self.get_model().objects.all ()
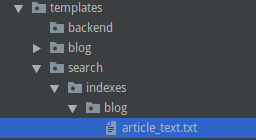
在 templates 下创建search/indexes/应用名目录,并在该应用名目录下创建 模型类_text.txt文件。
mkdir -p templates/search/indexes/blog
touch templates/search/indexes/blog/article_text.txt
# txt文件的格式必须是:  要检索的模型类的小写_text.txt
在该 txt 文件中列出所有要检索的字段,是该模型类中定义的字段,一定要加上 object
{{ object.title }}
{{ object.body }}
# 对标题和文章内容进行检索
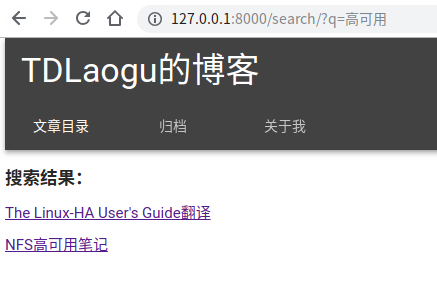
在 search 目录下创建一个search.html
{% block content %} {% if query %} <h3>搜索结果:</h3> {% for result in page.object_list %} <p><a href="{{ result.object.get_absolute_url }}">{{ result.object.title }}</a></p> {% empty %} <p>未找到</p> {% endfor %} {% if page.has_previous or page.has_next %} <div> {% if page.has_previous %}<a href="?q={{ query }}&page={{ page.previous_page_number }}">{% endif %}« Previous{% if page.has_previous %}</a>{% endif %} | {% if page.has_next %}<a href="?q={{ query }}&page={{ page.next_page_number }}">{% endif %}Next »{% if page.has_next %}</a>{% endif %} </div> {% endif %} {% endif %} {% endblock content %}
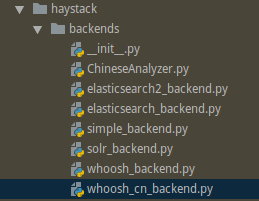
在 haystack 安装的目录下中建立ChineseAnalyzer.py,路径例如:venv/lib/python3.7/site-packages/haystack/backends。不需要改,直接复制即可。
import jiebafrom whoosh.analysis import Tokenizer, Tokenclass ChineseTokenizer (Tokenizer ): def __call__ (self, value, positions=False , chars=False , keeporiginal=False , removestops=True , start_pos=0 , start_char=0 , mode='' , **kwargs ): t = Token(positions, chars, removestops=removestops, mode=mode, **kwargs) seglist = jieba.cut(value, cut_all=True ) for w in seglist: t.original = t.text = w t.boost = 1.0 if positions: t.pos = start_pos + value.find(w) if chars: t.startchar = start_char + value.find(w) t.endchar = start_char + value.find(w) + len (w) yield t def ChineseAnalyzer (): return ChineseTokenizer()
将该目录中的whoosh_backend.py复制后改名为whoosh_cn_backend.py
并添加和修改以下内容
from .ChineseAnalyzer import ChineseAnalyzer
约164行的analyzer=StemmingAnalyzer() 修改为 analyzer=ChineseAnalyzer()
重建索引
python3 manage.py rebuild_index   # 会询问是否继续,y确认即可
Removing all documents from your index because you said so.
All documents removed.
Indexing 11 articles
Building prefix dict from the default dictionary ...
Loading model from cache /tmp/jieba.cache
Loading model cost 0.945 seconds.
Prefix dict has been built succesfully.
会在项目目录下生成一个whoosh_index目录,以后的检索就是基于这个目录。
在应用目录下的 urls 中添加
url(r'^mysearch/$', views.mysearch)
这个名字可随便取,是普通的视图实现,即通过此 url 访问搜索表单。然后在 views 中添加实现方法
def mysearch(request):
  return render(request, 'blog/mysearch.html')
在 templates 目录的应用目录下创一个mysearch.html
{% block content %}
<form method="get" action="/search" target="_self">
  <input type="text" name="q">
		# name必须是q
  <input type="submit">
</form>
{% endblock content %}
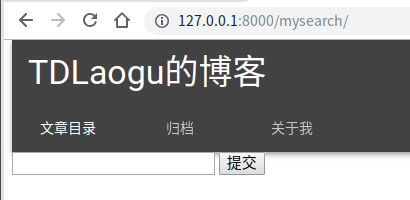
运行项目,添加几篇文章,进行测试。通过/mysearch访问表单页面
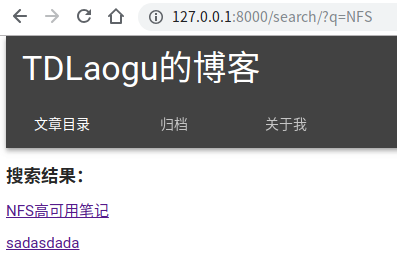
先进行英文单词的检索
检索成功,跳转到结果页面。再进行中文单词检索
改进 1 不需要 mysearch.html,不用在应用的 urls 中配置,不用配置 views 的 mysearch 方法。
注:使用的是 MDUI 前端 UI
直接在网页中的搜索框中建立表单
<div class ="mdui-col-xs-3" > <div class ="mdui-textfield mdui-textfield-expandable mdui-float-right" > <button class ="mdui-textfield-icon mdui-btn mdui-btn-icon" > <i class ="mdui-icon material-icons" > search</i > </button > <form method ="get" target ="_self" action ="/search" > <input name ="q" class ="mdui-textfield-input" type ="text" placeholder ="Search" /> </form > <button class ="mdui-textfield-close mdui-btn mdui-btn-icon" > <i class ="mdui-icon material-icons" > close</i > </button > </div > </div >
注:在简单实现中,搜索出的结果是无法进行超链接的。需要进行小的修改
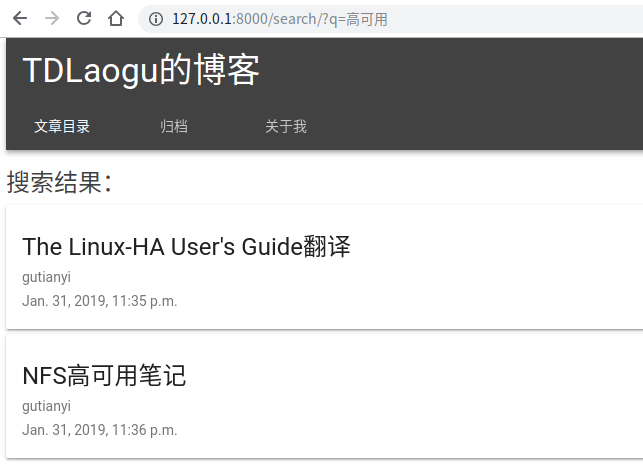
对搜索结果界面进行美化,使用与首页一致的卡片
{% block content %}
{% if query %}
  <div class="mdui-typo-headline-opacity" style="margin-top: 20px;">搜索结果:</div>
  <ul class="mdui-list mdui-center">
  {% for result in page.object_list %}
    <li class="mdui-card mdui-ripple mdui-shadow-2" style="margin-bottom: 5px">
      <a href="/{{ page.number }}/{{ result.object.id }}">
        <div class="mdui-card-primary">
          <div class="mdui-card-primary-title">{{ result.object.title }}</div>
          <div class="mdui-card-primary-subtitle">{{ result.object.author }}</div>
          <div class="mdui-card-primary-subtitle">{{ result.object.publish }}</div>
        </div>
      </a>
    </li>
  {% empty %}
  <div class="mdui-typo-headline-opacity">未找到</div>
  {% endfor %}
  </ul>
# 下面的内容不改
......
{% endblock content %}
参考文章:
django-haystack(全文检索-jieba 分词)
Django–全文检索功能