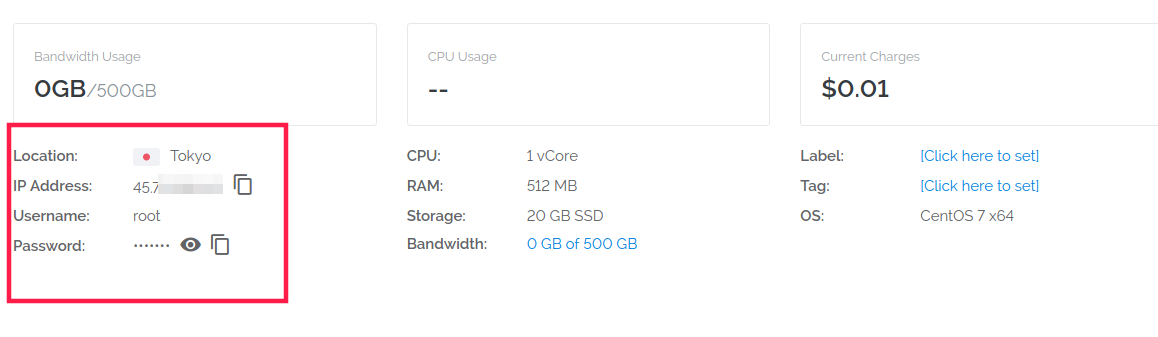
使用的是Vultr的云服务器,选择的节点在日本,服务器是最便宜的3.5$每月的。
在服务器页面会有提示密码,先用ssh-copy-id拷贝一下密钥,方便以后登录。
登录服务器后,下载shadowsocks脚本,并增加执行权限,然后运行,最好记录日志
wget --no-check-certificate https://raw.githubusercontent.com/teddysun/shadowsocks_install/master/shadowsocks.sh

chmod +x shadowsocks.sh

./shadowsocks.sh 2>&1 | tee shadowsocks.log
在安装过程中,会依次提示输入ss的密码
Please enter password for shadowsocks-python
(Default password: teddysun.com):
---------------------------
password = XXXX
---------------------------
输入服务器端端口号
Please enter a port for shadowsocks-python [1-65535]
(Default port: 12305):
---------------------------
port = 12305
---------------------------
输入加密算法,为了使iphone能用,选第七个aes-256-cfb
Please select stream cipher for shadowsocks-python:
1) aes-256-gcm
2) aes-192-gcm
3) aes-128-gcm
4) aes-256-ctr
5) aes-192-ctr
6) aes-128-ctr
7) aes-256-cfb
8) aes-192-cfb
9) aes-128-cfb
10) camellia-128-cfb
11) camellia-192-cfb
12) camellia-256-cfb
13) chacha20-ietf-poly1305
14) chacha20-ietf
15) chacha20
16) rc4-md5
Which cipher you'd select(Default: aes-256-gcm):
---------------------------
cipher = aes-256-cfb
---------------------------
最后开始安装,安装完成后就会提示ss的信息
至此,服务器端配置完成。
在自己的主机上安装shadowsocks客户端
apt-get install shadowsocks shadowsocks-client
然后配置ss服务器信息,修改配置文件/etc/shadowsocks/config.json
{
    "server":"XXX",          # 服务器地址
    "server_port":12305,     # 服务器端端口
    "local_address": "127.0.0.1",
    "local_port":1080,       # 本地端口,用于建立vpn隧道
    "password":"XXXX",       # ss服务器的密码
    "timeout":300,
    "method":"aes-256-cfb",  # 加密算法
    "fast_open": false,
    "workers": 1,
    "prefer_ipv6": false
}
最后使用命令启动shadowsocks-client
sshlocal -c /etc/shadowsocks/config.json

INFO: loading config from /etc/shadowsocks/config.json
2018-12-25 23:37:46 INFO     loading libcrypto from libcrypto.so.1.1
2018-12-25 23:37:46 INFO     starting local at 127.0.0.1:1080
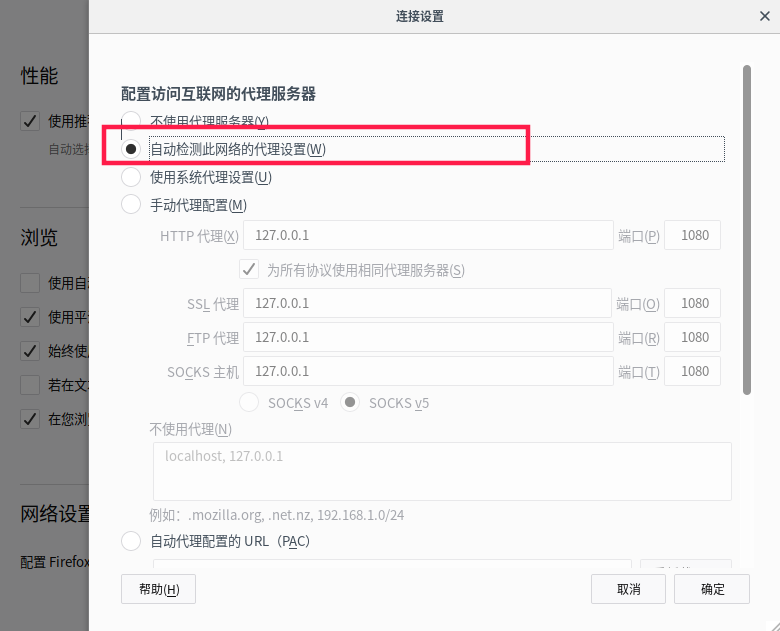
在浏览器上设置代理,选自动检测代理设置。
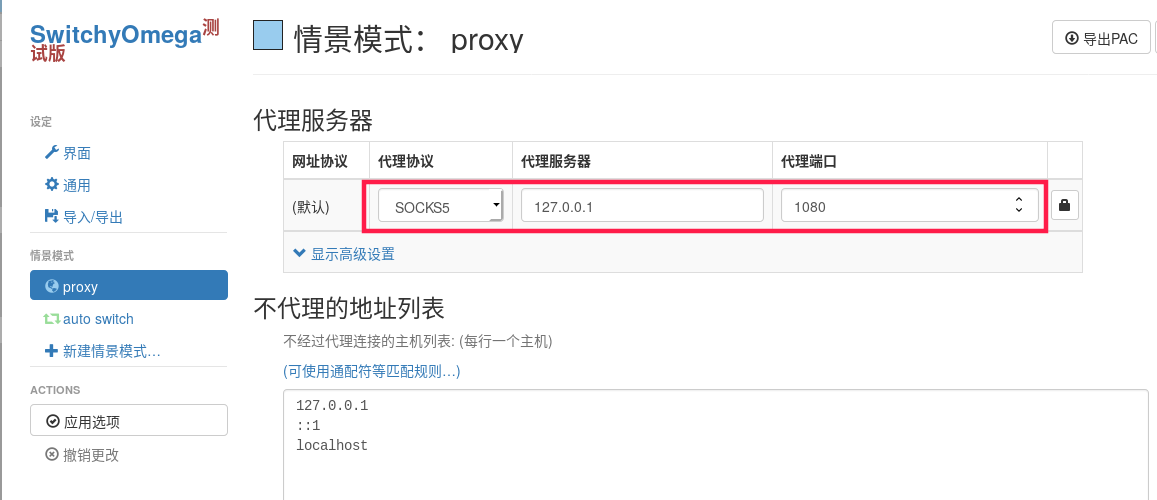
然后安装插件switchyomega进行配置
代理协议一定要是sock5,因为ss只支持sock5,不支持HTTP。
代理服务器须是本地,因为是ss远端与本地建立隧道,指向的端口也是本地端口,就是ss本地的配置中指定的端口。
应用选项后即可访问外网。还可以使用BBR加速,BBR是谷歌开发的内核模块,可使用脚本一键安装,需要内核版本4.9以上。脚本会自动检测内核版本,并安装最新的内核(通过elrepo源)。注:此脚本是在服务器上执行,而不是在本主机上执行。
wget --no-check-certificate https://github.com/teddysun/across/raw/master/bbr.sh
chmod +x bbr.sh
安装完成后查看bbr模块是否已加载
lsmod | grep bbr
tcp_bbr                20480  9
至此所有配置完成,可直接上外网了。
参考文章
Vultr vps搭建属于自己的ss 代理
使用BBR一键脚本为你的CentOS/Debian/Ubuntu系统加速